Lucy Taylor
I am Lucy Taylor who spent many years writing on tech-related topics on Troubleshooting windows, errors, tips & tricks . Apart from this, I love to cover the latest news and write opinionated articles.

Learn step by step method to screen recording in windows 10 and take screenshot as well.

Image Credits: pixabay
Reply

As we are progressing in the digital world, have you noticed that somehow almost all of us have started recording and clicking more and more pictures? Earlier people had cameras especially built for that but nowadays we have cameras almost everywhere. Be it phone cameras, webcams, and whatnot, we are recording a lot. And slowly but steadily it all led to us recording our screens. The applications of screen recording are just too many. We can record special moves or techniques while playing games and can upload them on social media or YouTube, one can screen record presentations and can use them later for extracting data much more easily, teachers can use it, students can use it, businesses use it and even individuals can use it for leisure. One can record screens in images or videos according to his or her needs. So in this article, I am going to share with you some tips on how you can easily record screens and take screenshots in Windows 10. Have a look:
Taking screenshots in Windows 10 is quite easy and there are multiple ways to do it.
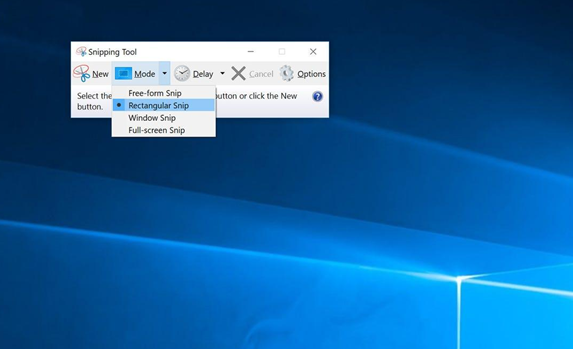
All these three methods are quite simple and direct. You don’t need to turn on anything or change any settings. One can readily use them. Now let’s take a look at how one can record a moving screen with sounds. Basically, be able to make a video of your screen. Let’s see how you can do that.
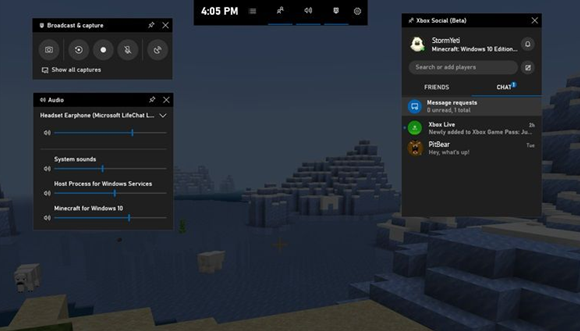
Windows 10 has been released with so many features that it sometimes feels like a really fulfilling experience. Even though I was not sure about the quality and features, after trying it, I believe that everyone should try it at least once. The recording tool embedded within the operating system is called Xbox Game Bar. It can record just about anything from gameplay, tutorials, and presentations to even sounds that are coming out of the computer to sounds recorded through microphones. However, it has its own limitations too and cannot record some windows like File Manager, Taskbar, etc. But still, I would say that it’s a pretty capable tool.
The video will be recorded with sounds so if you have any video playing on any other app then it will get recorded too. You can cancel the audio recording if you want. There are some great options and information available in the Game Bar app. Have a look and explore it at your own pace. I am sure that you will like it. By the way, I also talked about some shortcomings of this app in recording the screen and also the types of screenshots that you can take. If your work demands you to record other things as well that normally you cannot in Xbox Game Bar then I would suggest you try a third-party app to record the screen.
One of the best ways to record your screen and capture screenshots in multiple ways possible. The app gives numerous options to its users to use the features in the desired way. The user interface has also been designed in such a way that users can find their way intuitively and easily. You can screenshot in multiple modes like full screen, Window capture, custom screenshot, and capture video with or without audio. The best thing is, this application comes with its own image editor so if you want to make some basic changes like filters, effects, annotations, texts, etc you can do it quite easily. You can also pick a colour from any part of the screen to apply it to the image that you are editing, pretty cool, eh?
So these were the ways to record screens in Windows 10 that I wanted to share with you. Recording and capturing screens can be done with many other third-party apps as well but the quality is not that promising. Tweakshot Screen Capture can capture images and videos in High Definition.
Hope it helps.
Thanks for reading!
Suggested:
I am Lucy Taylor who spent many years writing on tech-related topics on Troubleshooting windows, errors, tips & tricks . Apart from this, I love to cover the latest news and write opinionated articles.


 Important Reasons to Hire A PPC advertising Expert
Hey Lucy,
Rijhu this side.
Very useful and comprehensive post. You really did an awesome job.
Thanks for sharing all the various tips how to take screenshots and record screen using windows 10. I’m aware about snipping tool and how to take take screenshots in windows 10 but unaware about recording screen in windows 10.
Thanks for sharing all the various ways to record screen in windows 10 and I will definitely try these all. I really liked the way you shared to record screen in such a step by step process making the concept very clear and easy to understand. A complete detail and definitely going to help many of those who don’t have any idea about all these. Keep writing more similar and informative posts.
Thanks & Regards,
-Rijhu.
Hey Lucy Taylor & Robin ,
Excellent and well-written post. I truly appreciate your hard-work.
Glad to say that you have done a fabulous work here and suggested helpful tips to record screen and take screenshots in window-10. Every time you comes up with fascinating ideas that are truly engaging & helpful in every aspect.
Your each of the suggested steps for taking screenshots and recording screen in window-10 are so clear and true enough to educate the readers & learners as well. Following the steps will be a great helping hand for window-10 users.
After going through this post i really got helpful ideas and have also boosted my knowledge upto some limit.
Eventually thanks for sharing your knowledge and such a fantastic post.