Robin Khokhar
Robin Khokhar is an SEO specialist who mostly writes on SEO. Thus sharing tips and tricks related to SEO, WordPress, blogging, and digital marketing, and related topics.

In the era of digital technology, video content is among the 1st ones to provide useful information or just to entertain when...

Reply

In the era of digital technology, video content is among the 1st ones to provide useful information or just to entertain when you are bored. No doubt, it’s much easier and faster to watch a video and see how the things should work than to read a long article with dozens of steps.
In case you are the one who creates educational, funny or any other videos, you should know that the better your video quality is, the more people will check and share it. Even if you just want to make a video for your friends, it will be cool to create something professional.
You might know that it’s not enough just to shoot a video. It will require some additional editings. Let’s check how to perform the most popular video editing tricks.
Sometimes it happens that you shoot a video piece by piece. In this case, you might want to join videos in a long movie. To do it fast and easily, use a free video tool or I will suggest Freemake which is free. It’s a great utility that can perform simple video editings and save your file in any video format you might need.
To get Freemake Video Converter, go to the official site and download the installer on your PC. Please keep in mind that the software runs only on Windows Vista, Windows 7, Win 8, and Win 10. If you are still using Win XP, contact the support center and ask to provide you a special Windows XP installer. And if you are using Mac then is an another paid software named Ace think Video master which you can use.
When you get the installer, run it on your PC or laptop. A great plus of Freemake Video Converter is that it has no ads or offers during the installation process. Thus you can be sure that you will install only the tool you need without dozens of additional utilities or toolbars.
After the installation process is completed, run the software by clicking a yellow triangle icon on a desktop. You’ll see a pleasant, colorful interface. Don’t worry! Although there might seem to be many buttons, the tool is extremely easy to use.

The top row consists of media type buttons: Video, Audio, DVD, Paste URL. To add files into the software, you need to click a corresponding button and choose the files to add. For example, to add videos, click the +Video button. Alternatively, you may drag-n-drop the files from a folder or a desktop.
As soon as you chose videos, pay attention to the top right corner of the utility. There you’ll see the Join files button. Enable it to merge the videos. Please note that you should add videos into the software in the order you want them to be in the final file.
Now it’s time to choose an output format for your new video. Depending on your goal, it can be DVD if you want to enjoy it on a DVD player, MP4 for watching on mobile, AVI or MPEG for TV sets, and so on.
Click on the chosen format and select a video quality preset from a drop-down menu. Set a destination folder for a new video. Please note that the software doesn’t delete the original files, but creates new ones. Thus make sure you have enough of free disk space. Then click the Convert button and run the conversion process.
It’s one of the most necessary video editing features and one of the easiest video editing tricks. It might occur that you’ve shot a scene you don’t want to be in your movie. You can easily get rid of it. Let’s get back to Freemake Video Converter.
Add a video that contains ads or any other unwanted parts. Please don’t add files with an h265 codec; they are not supported by the software. So you won’t be able to edit them.
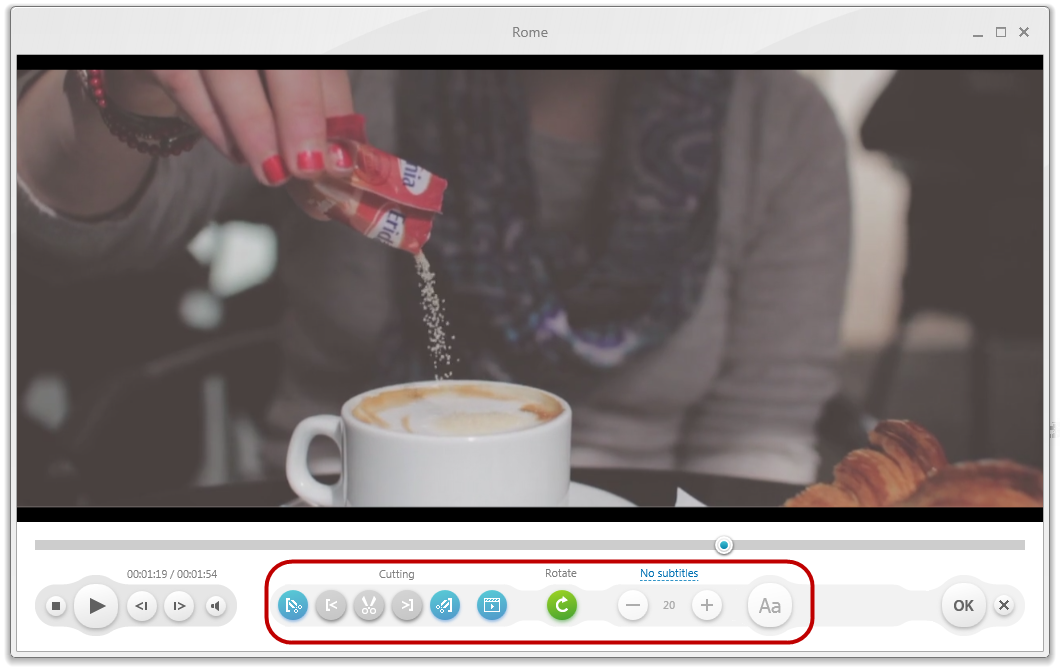
When the video appears in the software, click on the green button with scissors next to it. There will appear Freemake editor and a preview of your video. Move the toggle to the beginning of a part that you want to cut and mark it with a left scissor button at the bottom of the software. Do the same for the end of the part. Then click the middle scissors button to cut it. Repeat these steps to cut more episodes.
When you are done with video cutting, click the OK button in the low right corner. Then convert your movie to apply changes.
If it happened to you to take a video in a wrong orientation, don’t be sad. It can be easily corrected with Freemake. Simply add a video with a wring rotation and run the Freemake editor. Then click the green button with an arrow to rotate your video. If you click once, the video will be rotated 90 degrees; two clicks will rotate the video 180 degrees.
Now press OK and convert your rotated video.
One more thing you might need is to add a custom audio track for your video. It may be a song or a recording with your comments. To add a song with Freemake, drag-n-drop your video into the software. Pay attention to the sings to the right of the video. Choose audio settings and then the Add audio option. Select your audio track. Please note that Freemake Video Converter doesn’t have an option to manually sync video and audio. The sound will start playing together with the video and will end when the video stops. If you need to sync audio and video manually, go for another software – Windows Movie Maker.
Don’t forget to convert video to get it with a new music track.
In case you want to introduce yourself or give some info to your viewers before they start watching a video, you can add a custom image at the beginning of the clip. Prepare the image with any photo editor and then add it into Freemake. After that add your video, enable the Join option and convert the project. You may add several images if you like. But they will all be at the beginning of a movie.
Again, run the conversion process to get changes.
If you are a proficient user and know how to create custom subtitles, you can create an.SRT file to add onto your movie. Freemake will let you embed the subtitles into your video and edit their font and size (available in an extended pack). To do it, just add your movie into the tool. Then click on the video line and go for the Add subtitles option.
To edit subtitles font or size, run Freemake editor and check the buttons to the right of a Rotate option. There are four fonts available. The size varies from 10 to 20.
With Freemake Video Converter, you can select any output size for your movie. It may be helpful when you need to send a file via email, burn to a disk, upload to a website, and so on. There is a ready option in the software that will help you resize your video without quality loss. To use the feature, select a video extension for your future clip. Pay attention to the right button above the Convert one to see an estimated video size. Click it and insert the size you need. It’s recommended not to go below the minimum number as not to lose your video quality.
If your video camera adds black bars to your video, it’s not what you might want to have in the final movie. To delete black bars with Freemake, you’ll need an extended Gold Pack. It lets delete all black borders automatically.
To cut the black bars, add your video into the software. Then go to Options – Black Bars and make sure the option is enabled. Preview the file in Freemake editor.
If everything is OK, convert the video to a necessary format.
Freemake provides the enormous number of output video presets. However, if none suits your needs, you can create a custom preset with the necessary settings.
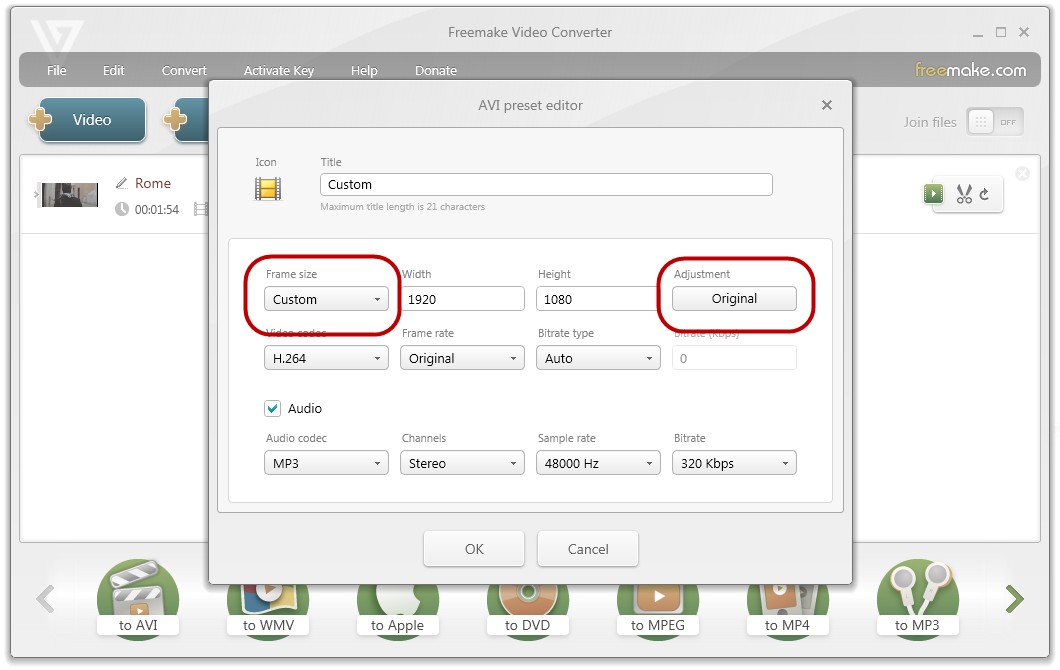
To do it, select any output format and choose a Custom preset option from the drop-down menu. Choose a video codec, fps, frame size. For the latter, you may select custom settings as well. If you click the Custom option, you’ll see an Adjustment button. You might leave it as is or stretch the video, zoom & crop it, auto-adjust, or add black bars.
When you are done, you can save the new profile for future use.
Whenever you want to share your video on your website or blog, Freemake will help you edit it for online viewing in the best way possible. You don’t need to think about codecs and HTML-codes, the software will do the job for.
What you need to do it to add your video into Freemake and go for the HTML5 option. The software will create a movie in three formats (MP4, OGG, WebM) supported by the majority of popular browsers. It will also provide you’re a ready-to-paste code with a built-in video player.
The only thing you should do is to copy the code and paste on your web-page.
That’ how you can perform simple editings with Freemake Video Converter.
What other changes would you like to make in your video?
What tools do you use?
Robin Khokhar is an SEO specialist who mostly writes on SEO. Thus sharing tips and tricks related to SEO, WordPress, blogging, and digital marketing, and related topics.


 The 13 Steps Needed For Putting Internet Marketing Into Action
Hi Robin,
I am an entrepreneur and do run a company for which I have to handle so many world. There are so many videos which we make for our company. But there is no perfectionism in our videos… Reading your article has given some tips… I will surely apply these tips for videos making.
Thanks for sharing the article.
Hi Robin Khokhar,
Thank you for sharing this informative Post. I really like this. Best Collection you have about Video Editing App.
Hi
I’m looking some information on this topic and i glad to found your site
thanks for sharing this good article.
nice information.
Thank you for the share…